2023年5月12日 星期五

Unity 串列埠連接Arduino:測試(三)

 在上一篇文章Unity 串列埠連接Arduino:測試(二),已經將Arduino與Unity的專案連接成功,可以透過Arduino端的搖桿來控制Unity中的物件移動與旋轉。接著在本篇文章中我們兩個目標要達成:

(1)將UI移到一個新場景中,利用DontDestroyOnLoad的功能,讓Unity即使在場景變更中,串列埠的設定介面仍然存在、連線不會中斷。
(2)Unity端不再採用FixedUpdate,改成利用Thread來進行串列埠資料讀取。

首先在Unity中新增一個場景UI_0,場景中只放一個空物件,將UI(包括Canvas和EventSystem)移到這空物件下。並在Canvas下新增三個Button:

對應的函數如下:
using UnityEngine.SceneManagement;
    public void S1()
    {
        SceneManager.LoadScene("Scene1");
    }
    public void S2()
    {
        SceneManager.LoadScene("Scene2");
    }
    public void GameQuit()
    {
        Application.Quit();
    }
與第一篇方式相同,將對應的事件與執行的函數設定好。

接著將第一個場景改名為Scene1,並新增一個場景Scene2,在Scene2放入一個3D物件。
新增一個腳本S2motio.cs,附加在該物件上:
------------------------------------------------------------
using System.Collections;
using System.Collections.Generic;
using UnityEngine;

public class S2motion : MonoBehaviour
{
    public float rspeed = 30f;
    void Start()
    {
    }

    // Update is called once per frame
    void Update()
    {
        transform.position = new Vector3((-ComData.X + 512) / 10 * 0.1f, 0, (ComData.Y - 512) / 10 * 0.1f);
        if (ComData.R == 0)
        {
            transform.Rotate(Vector3.forward * Time.deltaTime * rspeed);
        }
    }
}
----------------------------------------------------------------------------------------

接著新增一個腳本DDO.cs, 附加在UI_0場景中的GameObject(底下有Canvas和EventSystem等)
-------------------------------------------------------------------------------------
using System.Collections;
using System.Collections.Generic;
using UnityEngine;
using UnityEngine.SceneManagement;

public class DDO : MonoBehaviour
{
    // Start is called before the first frame update
    void Start()
    {
        DontDestroyOnLoad(gameObject);
        SceneManager.LoadScene("Scene1");
    }

    // Update is called once per frame
    void Update()
    {
    }
}
-------------------------------------------------------------------------------
該腳本執行時,會將物件移到DontDestroyOnLoad,並且載入Scene1。

接著將Serialsetup.cs修改如下:
--------------------------------------------------------------------
using System.Collections;
using System.Collections.Generic;
using UnityEngine;
using UnityEngine.UI;
using System.IO.Ports;
using System;
using UnityEngine.SceneManagement;
using System.Threading;

public class Serialsetup : MonoBehaviour
{
    public static SerialPort sp = new SerialPort();
    private string V = "1";
    private string[] words = null;
    public GameObject Canv, B_C, B_D;
    public Dropdown Dp1;
    private string PN = null;
    private string[] Com_name=null;
    private List<string> list;
    private bool b_conv = true;
    private Thread t;
    private Boolean receiving;
    public void GameQuit()
    {
        Application.Quit();
    }
    public void S1()
    {
        SceneManager.LoadScene("Scene1");
    }
    public void S2()
    {
        SceneManager.LoadScene("Scene2");
    }
    public void AddSerial()
    {        
        PN = Dp1.options[Dp1.value].text;
        if (!sp.IsOpen)
        {
            B_C.SetActive(true);
            B_D.SetActive(false);
        }
    }

    public void Connect()
    {
        try
        {
            sp.BaudRate = 115200;
            sp.Parity = Parity.None;
            sp.DataBits = 8;
            sp.StopBits = StopBits.One;
            sp.PortName = PN;
            sp.ReadTimeout = 2;  
            B_D.SetActive(true);
            B_C.SetActive(false);
            if (!sp.IsOpen)
            {
                sp.Open();
                receiving = true;
                t = new Thread(DoReceive);
                t.IsBackground = true;
                t.Start();
            }
        }
        catch (System.Exception)
        {
        }
    }
    private void DoReceive()
    {
        while (receiving)
        {
            try
            {
                if (sp.BytesToRead > 0)
                {
                    ReadandSplit();
                }
            }catch (System.Exception)
            {
                    Debug.Log("not good");
            }
            Thread.Sleep(5);
        }
    }
    public void Disconnect()
    {
        receiving = false;
        t.Abort();
        sp.Close();
        B_C.SetActive(true);
        B_D.SetActive(false);
    }
    void Start()
    {

        B_C.SetActive(false);
        B_D.SetActive(false);
        Com_name = SerialPort.GetPortNames();
        list= new List<string>(Com_name);
        Dp1.AddOptions(list);
    }
    // Update is called once per frame
    void Update()
    {
        if (sp.IsOpen)
        {
            if (Input.GetKeyDown(KeyCode.Escape))
            {
                b_conv = !b_conv;
                Canv.SetActive(b_conv);
            }
        }
        else
        {
            Canv.SetActive(true);
        }        
    }
    private void ReadandSplit()
    {
        for (int i=1; i<5; i++)
        {
            V = sp.ReadLine();
            while (sp.BytesToRead > 30)
            {
                V = sp.ReadLine();
                Debug.Log("R");
            }
            words =V.Split(',');
            if (V.StartsWith("B") && V.EndsWith("D"))
            {
                ComData.R = Int32.Parse(words[1]);
                ComData.X = Int32.Parse(words[2]);
                ComData.Y = Int32.Parse(words[3]);
                Debug.Log(i);
                break;
            }
        }
    }
    void OnDisable()
    {
        t.Abort();
        sp.Close();
    }
    void OnApplicationQuit()
    {
        t.Abort();
        sp.Close();
    }
}
----------------------------------------------------------------------------------
主要是Connect的修改,其新增一個Thread,並以DoReceive來讀取資料。
    public void Connect()
    {
        try
        {
            sp.BaudRate = 115200;
            sp.Parity = Parity.None;
            sp.DataBits = 8;
            sp.StopBits = StopBits.One;
            sp.PortName = PN;
            sp.ReadTimeout = 2;  
            B_D.SetActive(true);
            B_C.SetActive(false);
            if (!sp.IsOpen)
            {
                sp.Open();
                receiving = true;
                t = new Thread(DoReceive);
                t.IsBackground = true;
                t.Start();
            }
        }
        catch (System.Exception)
        {
        }
    }
    private void DoReceive()
    {
        while (receiving)
        {
            try
            {
                if (sp.BytesToRead > 0)
                {
                    ReadandSplit();
                }
            }catch (System.Exception)
            {
                    Debug.Log("not good");
            }
            Thread.Sleep(5);
        }
    }
-------------------------------------------------------------
在DoReceive()中,BytesToRead > 0即進行資料讀取(ReadLine)與拆解。
在ReadandSplit(),也做了一些修正:
-----------------------------------------------------
    private void ReadandSplit()
    {
        for (int i=1; i<5; i++)
        {
            V = sp.ReadLine();
            while (sp.BytesToRead > 15)
            {
                V = sp.ReadLine();
                Debug.Log("R");
            }
            words =V.Split(',');
            if (V.StartsWith("B") && V.EndsWith("D"))
            {
                ComData.R = Int32.Parse(words[1]);
                ComData.X = Int32.Parse(words[2]);
                ComData.Y = Int32.Parse(words[3]);
                Debug.Log(i);
                break;
            }
        }
    }
---------------------------------------------------
之前我們使用DiscardInBuffer,在丟棄資料時,可能會造成一行資料被丟棄一部分,產生錯誤。
另外,利用Split拆解字串,拆解後檢查第一個字串(words[0])和第五個字串(words[4]),這個方法有疑慮,因為當資料不正確時,words[4]可能不存在。
針對第一個問題,我們改成先讀取一次(ReadLine),接著如果BytesToRead大於某個數字(依資料量而定),則再繼續讀取,這樣可以達到丟棄資料的效果,也不會破壞資料整行的完整性。
對於第二個問題,則改用StartsWith("B") 和EndsWith("D")來檢查資料的正確性。

在Disconnect()也需加入
        receiving = false;
        t.Abort();

最後再加入
    void OnDisable()
    {
        t.Abort();
        sp.Close();
    }
    void OnApplicationQuit()
    {
        t.Abort();
        sp.Close();
    }
當應用程式關閉時,關閉這個Thread和串列埠連線。
測試時,Arduino端的dealy 1ms,Unity端的Thread.Sleep 5ms。
執行結果如下:

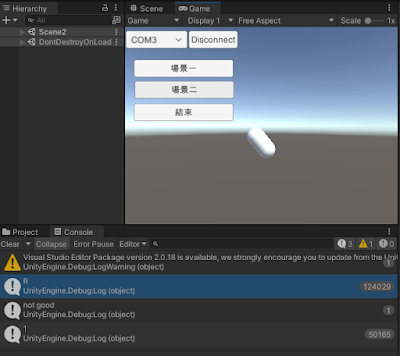
讀取資料成功50165行時,丟棄資料124029次,大約2:5。沒有讀第二次才成功的狀況產生,not good的狀況也只產生一次。場景切換也成功。

Build時產生一個警告訊息
System.Windows.Forms.dll assembly is referenced by user code, but is not supported on StandaloneWindows64 platform. Various failures might follow.
UnityEngine.GUIUtility:ProcessEvent (int,intptr,bool&)
但執行Build出來的執行檔,可執行且測試成功。

上面這個警告訊息,經過追蹤,似乎在Api Compatibility Level設定為.Net 4.x之後就出現了!

2023年5月7日 星期日

Unity 串列埠連接Arduino:測試(二)

 在上一篇文章Unity 串列埠連接Arduino:測試(一),雖然已經將Arduino與Unity的專案連接成功,可以透過Arduino端的搖桿來控制Unity中的物件旋轉與否;表面上成功,但實際上資料傳送有不少問題存在。

在Arduino傳送資料與Unity中C#讀取資料的過程中,實際上有產生錯誤。但在上篇文章的測試中,僅傳輸0或1,不容易觀察到資料錯誤的狀況。

在本篇文章,我們將Arduino程式修改如下:

-----------------------------------------------------
int SK, SX, SY;
String SSK, SSX, SSY; 
void setup() {
  // put your setup code here, to run once:
    Serial.begin(115200);
    pinMode(12, INPUT);
}

void loop() {
  // put your main code here, to run repeatedly:
     SK=digitalRead(12);
     SX=analogRead(A0);
     SY=analogRead(A1);
     SSK=String(SK);
     SSX=String(SX);
     SSY=String(SY);
     Serial.println("B,"+SSK+","+SSX+","+SSY+",D");
     //Serial.println(SSK);
     delay(7);
}

-----------------------------------------------------

Serial.println("B,"+SSK+","+SSX+","+SSY+",D");

傳送SSK、SSX、SSY這3個資料,分別對應按鈕、搖桿左右搖、搖桿前後搖三個資料,以","隔開,並在前面加入一個開始字元B,在結束加入一個結束字元D。

在Serialsetup.cs中修改如下:

-----------------------------------------------------
using System.Collections;
using System.Collections.Generic;
using UnityEngine;
using UnityEngine.UI;
using System.IO.Ports;
using System;

public class Serialsetup : MonoBehaviour
{
    public static SerialPort sp = new SerialPort();
    private string V = "1";
    private string[] words = null;
    public GameObject Canv, B_C, B_D;
    public Dropdown Dp1;
    private string[] Com_name=null;
    private List<string> list;
    private bool b_conv = true;
    // Start is called before the first frame update
    public void AddSerial()
    {        
        PN = Dp1.options[Dp1.value].text;
        if (!sp.IsOpen)
        {
            B_C.SetActive(true);
            B_D.SetActive(false);
        }
        
    }

    public void Connect()
    {
        try
        {
            sp.BaudRate = 115200;
            sp.Parity = Parity.None;
            sp.DataBits = 8;
            sp.StopBits = StopBits.One;
            sp.PortName = PN;
            sp.ReadTimeout = 2;
            sp.Open();            
            B_D.SetActive(true);
            B_C.SetActive(false);
        }
        catch (System.Exception)
        {
        }
    }
    public void Disconnect()
    {
        sp.Close();
        B_C.SetActive(true);
        B_D.SetActive(false);
    }
    void Start()
    {

        B_C.SetActive(false);
        B_D.SetActive(false);
        Com_name = SerialPort.GetPortNames();
        list= new List<string>(Com_name);
        Dp1.AddOptions(list);
    }
    // Update is called once per frame
    void Update()
    {
        if (sp.IsOpen)
        {
            if (Input.GetKeyDown(KeyCode.Escape))
            {
                b_conv = !b_conv;
                Canv.SetActive(b_conv);
            }
        }
        else
        {
            Canv.SetActive(true);
        }        
    }
    private void ReadandSplit()
    {
        V = sp.ReadLine();
        Debug.Log(V);
    }
    private void FixedUpdate()
    {
        if (sp.IsOpen)
        {
            try
            {
                ReadandSplit();
                //sp.DiscardInBuffer();
            }
            catch (System.Exception)
            {
            }
        }
    }

}

----------------------------------------------------------------

sp.DiscardInBuffer()先不執行,觀察每一筆資料,在Console視窗有時可以看到錯誤資料

如上圖紅框中所示。(但不確定什麼原因造成,有可能是Arduino端造成的)

由於我們採用的傳送是固定時間間隔傳送和接收,如果Aruino傳送時間間隔太短,Unity這端讀取資料時間間隔為0.02sec(FixedUpdate()設定為每0.02秒執行一次),資料累積的結果,將造成Unity在後續應用這些資料做控制時有Lag的現象。但如果Arduino傳送資料的間隔太長,則會造成Unity讀不到資料(這裡利用例外處理避免掉錯誤引起的一些困擾)。

因此,我們採用的方式是Arduino的dealy設為7。並且在ReadLine讀取成功之後,將inBuffer的資料丟掉(sp.DiscardInBuffer())。不過,使用DiscardInBuffer()後,資料讀取不正確的比例上升很多。

為了避免資料不正確產生後續的錯誤,當讀取資料不正確,則再讀取下一行,最多讀取4次。利用Split來拆解字串,拆解後檢查第一個字串(words[0])和第五個字串(words[4]),如分別為B和D,視為正確。

ReadandSplit()修改如下
-----------------------------------------------------
    private void ReadandSplit()
    {
        for (int i=1; i<5; i++)
        {
            V = sp.ReadLine();
            words =V.Split(',');
            if (words[0] == "B" && words[4] == "D")
            {                
                Debug.Log(i);
                break;
            }
        }
    }

----------------------------------------------------------------

由Console視窗觀察,最多讀取2次即可成功。(但仍然有產生錯誤的狀況)

讀取第一次即成功和讀取第二次成功的比例與Arduino的dealy時間(間隔)有關。

最後ReadandSplit()、FixedUpdate()修改如下
-----------------------------------------------------
    private void ReadandSplit()
    {
        for (int i=1; i<5; i++)
        {
            V = sp.ReadLine();
            words =V.Split(',');
            if (words[0] == "B" && words[4] == "D")
            {
                ComData.R = Int32.Parse(words[1]);
                ComData.X = Int32.Parse(words[2]);
                ComData.Y = Int32.Parse(words[3]);
                break;
            }
        }
    }
    private void FixedUpdate()
    {
        if (sp.IsOpen)
        {
            try
            {
                ReadandSplit();
                sp.DiscardInBuffer();
            }
            catch (System.Exception)
            {                
                Debug.Log("not good");
            }
        }
    }

----------------------------------------------------------------

上面程式中,如果有某一次FixedUpdate()在執行ReadandSplit()、sp.DiscardInBuffer()失敗時,則顯示"not good"。

ComData.cs修改如下
-----------------------------------------------------
using System.Collections;
using System.Collections.Generic;
using UnityEngine;

static class ComData
{
    public static int R=1;
    public static int X = 512;
    public static int Y = 512;
}
----------------------------------------------------------------

Ctrlmotion.cs修改如下
-----------------------------------------------------
using System.Collections;
using System.Collections.Generic;
using UnityEngine;

public class Ctrlmotion : MonoBehaviour
{
  public float rspeed = 5f;
    void Start()
    {
}

    // Update is called once per frame
    void Update()
    {
        transform.position = new Vector3((-ComData.X + 512)/10*0.1f, 0, (ComData.Y - 512)/10*0.1f);
        if (ComData.R==0)
{
transform.Rotate(Vector3.up * Time.deltaTime*rspeed);
}
    }
}
----------------------------------------------------------------
在20分鐘的測試中只出現3次not good的狀況。但讀取第二次才成功的比例不少。
Cube由搖桿控制的狀況也OK,前後左右移動、旋轉均沒有明顯延遲的情況產生。

2023年5月6日 星期六

Unity 串列埠連接Arduino:測試(一)

底下三篇文章是要測試Arduino透過串列埠傳輸資料到PC,藉以控制Unity專案上的物件。


想法:

(1)Arduino以固定(或幾乎固定)時間間隔,每次傳送一個字串(一行),裡面包含幾個相關數據。
(2)Unity以固定(或幾乎固定)時間間隔,每次讀取一行字串,再拆解取得相關數據。
(3)Arduino端以較短的時間間隔傳送資料,Unity端以較長的時間間隔讀取資料,為避免資料累積造成lag,Unity端可以將多的資料丟棄。
(4)Unity端利用UI上的下拉式選單、按鈕,藉以設定串列埠名稱、開啟連線、結束連線等功能。
(5)串列埠連線需常駐,不會因Unity端變更場景而造成斷線或需重新連線。

因測試文章較長,亦可直接看最後第三篇的作法。

=====================================================================
 在第一篇文章中,我們首先建立Arduino與Unity專案的串列埠連線的基本功能:

利用Arduino連接搖桿產生數據,一開始為簡化問題,先只傳送按鈕數據(1個字元),按鈕沒按下時傳送1,按下時傳送0。以Serial.println傳送。

S-K接Pin12
S-X接A0、S-Y接A1
Arduino程式:
-----------------------------------------------------
int SK, SX, SY;
String SSK, SSX, SSY; 
void setup() {
  // put your setup code here, to run once:
    Serial.begin(9600);
    pinMode(12, INPUT);
}

void loop() {
  // put your main code here, to run repeatedly:
     SK=digitalRead(12);
     SX=analogRead(A0);
     SY=analogRead(A1);
     SSK=String(SK);
     SSX=String(SX);
     SSY=String(SY);
     Serial.println(SSK);
     delay(5);
}

=========================================

先利用Arduino IDE的Serial Monitor檢查資料是否正確

按鈕未按下時,傳輸1,按鈕按下時,傳輸0

測試完,記得關閉Serial Monitor。

==========================================

==========================================

Unity端

在場景中放置一個Cube

調整Main Camera高度與角度

目的:當Arduino端連接的搖桿未按下時,Cube不旋轉。搖桿按下時,Cube旋轉。

先在專案Asset視窗中新建一個C#檔ComData.cs,設定共用變數

C#程式:
-----------------------------------------------------
using System.Collections;
using System.Collections.Generic;
using UnityEngine;

static class ComData
{
    public static int R=1;
}

=========================================

再建立一個腳本Ctrlmotion.cs,附加在Cube上。

C#程式:
-----------------------------------------------------
using System.Collections;
using System.Collections.Generic;
using UnityEngine;

public class Ctrlmotion : MonoBehaviour
{
public float rspeed =30f;
    void Start()
    {
    }
    // Update is called once per frame
    void Update()
    {
        if (ComData.R==0)
{
       transform.Rotate(Vector3.up * Time.deltaTime*rspeed);
      }
    }
}

----------------------------------------------------------------

可在inspector視窗調整rspeed數值,改變旋轉速度。 

==========================================

接著在Hierarchy視窗中加入Canvas,在Canvas中加入2個按鈕、1個下拉式選單。

修改物件名稱如下


在下拉式選單的inspector視窗中,將Options先刪除。

其選項可在C#程式中,由SerialPort.GetPortNames()取得。

但SerialPort.GetPortNames()的資料型態是string陣列,

需再轉為List。

==========================================

接著建立一個腳本Serialsetup.cs,附加在EventSystem上。

C#程式:
-----------------------------------------------------
using System.Collections;
using System.Collections.Generic;
using UnityEngine;
using UnityEngine.UI;
using System.IO.Ports;

public class Serialsetup : MonoBehaviour
{
    public static SerialPort sp = new SerialPort();
    private string V = "1";
    public GameObject Canv, B_C, B_D;
    public Dropdown Dp1;
    private string PN = null;
    private string[] Com_name=null;
    private List<string> list;
    private bool b_conv = true;
    // Start is called before the first frame update
    public void AddSerial()
    {        
        PN = Dp1.options[Dp1.value].text;
        if (!sp.IsOpen)
        {
            B_C.SetActive(true);
            B_D.SetActive(false);
        }
        
    }

    public void Connect()
    {
        try
        {
            sp.BaudRate = 9600;
            sp.Parity = Parity.None;
            sp.DataBits = 8;
            sp.StopBits = StopBits.One;
            sp.PortName = PN;
            sp.Open();
            sp.ReadTimeout = 1;
            B_D.SetActive(true);
            B_C.SetActive(false);
        }
        catch (System.Exception)
        {
        }
    }
    public void Disconnect()
    {
        sp.Close();
        B_C.SetActive(true);
        B_D.SetActive(false);
    }
    void Start()
    {

        B_C.SetActive(false);
        B_D.SetActive(false);
        Com_name = SerialPort.GetPortNames();
        list= new List<string>(Com_name);
        Dp1.AddOptions(list);
    }
    // Update is called once per frame
    void Update()
    {
        if (sp.IsOpen)
        {
            if (Input.GetKeyDown(KeyCode.Escape))
            {
                b_conv = !b_conv;
                Canv.SetActive(b_conv);
            }
        }
        else
        {
            Canv.SetActive(true);
        }        
    }
    private void FixedUpdate()
    {
        
        if (sp.IsOpen)
        {
            try
            {
                V = sp.ReadLine();
                sp.DiscardInBuffer();
            }
            catch (System.Exception)
            {
            }           
        }

        if (V == "1")
        {
            ComData.R = 1;
        }
        else if (V == "0")
        {
            ComData.R = 0;
        }
    }
}

----------------------------------------------------------------

這邊須注意,如果無法加入System.IO.Ports,檢查Api Compatibility Level

是否設定為.Net 4.x


在EventSystem的inspector視窗中,在加入的腳本元件中,拉入對應的物件:


在Button1的inspector視窗中,將EventSystem拉入,選擇對應的function:


Button2和下拉式選單也是相同設定:


    說明:
    一開始先將2個Button設定為不執行;
        B_C.SetActive(false);
        B_D.SetActive(false);
    取得串列埠PortName(字串陣列),轉換成List,再加入成為下拉式選單的選項:    
       Com_name = SerialPort.GetPortNames();
        list= new List<string>(Com_name);
        Dp1.AddOptions(list);
    
    當下拉式選單所選的項目被改變時,執行AddSerial()
    首先取得被選項的文字(字串)
     PN = Dp1.options[Dp1.value].text;
     當串列埠未開啟時,將Button(Connect)設為可使用,Button(Disconnect)設為不可使用。
     反之,則不改變2個Button的狀態。
        if (!sp.IsOpen)
        {
            B_C.SetActive(true);
            B_D.SetActive(false);
        }
        
    當Button(Connect)可使用時,其被按下,則執行Connect()。
    設定串列埠的一些參數,並開啟連線。並改變2個Button的狀態。

    當Button(Disconnect)可使用時,其被按下,則執行Disconnect()。
    其關閉連線,並改變2個Button的狀態。

    使用FixedUpdate(),固定時間間隔執行。
    當串列埠開啟時,讀取一行字串:
     V = sp.ReadLine();
    並將inBuffer的資料捨棄。
     sp.DiscardInBuffer();
    如果該字串內容是"1",則將ComData的共用參數R設為1;
    如果該字串內容是"0",則將ComData的共用參數R設為0。

    此外,在Update()執行鍵盤input判斷,當連線開啟時,按下Esc可使介面隱藏或出現。

===============================================================

執行結果:

下拉式選單中選擇PortName

接著在螢幕按鈕按下Connect

在實體搖桿,按下搖桿時,Cube旋轉;放開則Cube不旋轉。